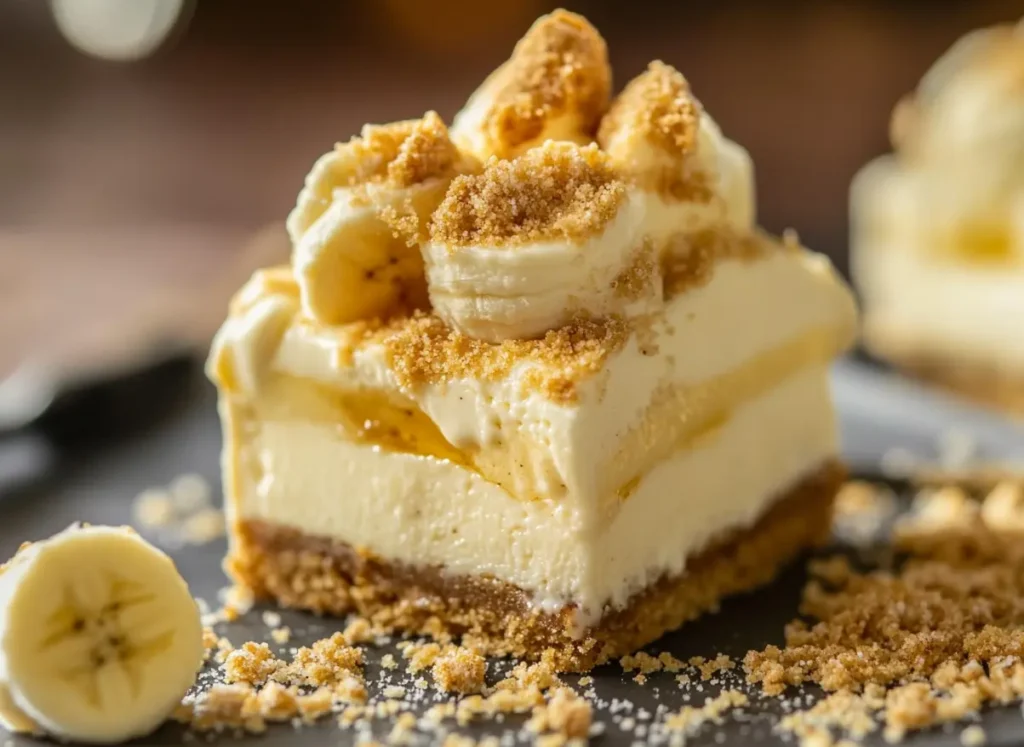
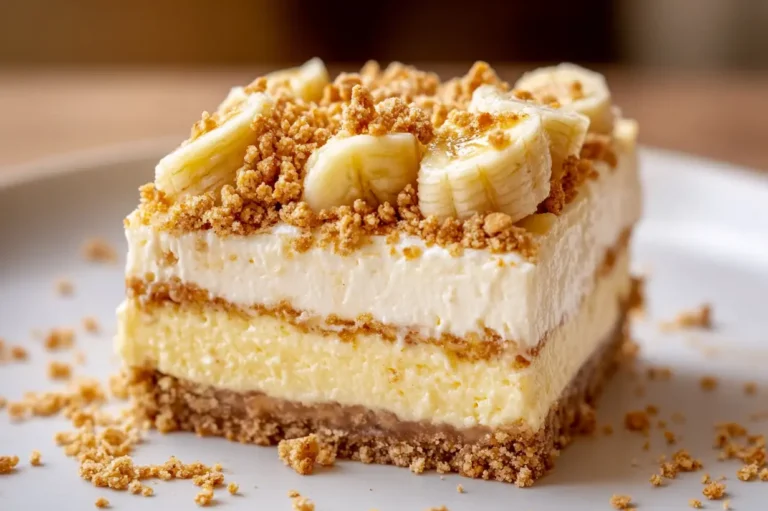
There’s nothing quite like the creamy, dreamy goodness of banana pudding crunch cheesecake. Imagine the smooth texture of classic cheesecake, the nostalgic taste of banana pudding, and the delightful crunch of a crispy topping—all in one irresistible dessert! Whether you’re a seasoned baker or a kitchen newbie, this guide will walk you through everything you need to know about making this indulgent treat.
In this article, we’ll cover the ingredients, step-by-step instructions, expert tips, and fun variations to customize your cheesecake. Plus, we’ll tackle common mistakes and answer frequently asked questions. So, if you’re ready to whip up a banana pudding cheesecake that’s bound to impress, let’s dive in!
Introduction to Banana Pudding Crunch Cheesecake
What is Banana Pudding Crunch Cheesecake?
Banana pudding crunch cheesecake is the perfect fusion of two classic desserts—rich, velvety cheesecake and comforting banana pudding. But what sets this version apart? The crunchy topping! A delightful layer of crushed vanilla wafers, graham crackers, or even caramelized nuts adds the perfect contrast to the silky cheesecake and pudding layers.
Unlike traditional cheesecakes, this recipe includes a luscious banana pudding layer that infuses every bite with sweet, fruity goodness. It’s a show-stopping dessert that’s great for holidays, birthdays, or just a weekend treat!
Why This Recipe is a Must-Try
If you love banana pudding and cheesecake, this recipe brings the best of both worlds together. Here’s why you’ll love it:
✔ Creamy and Crunchy: The perfect balance of smooth cheesecake and a crispy topping.
✔ Easy to Customize: Swap ingredients to fit your taste (or diet!).
✔ No-Bake or Baked Options: Make it with or without the oven.
✔ Crowd-Pleaser: Perfect for parties, potlucks, and family gatherings.
The Perfect Combination of Flavors
Every layer in this cheesecake brings something special:
- Buttery Crunchy Crust: A blend of vanilla wafers and graham crackers for a crisp foundation.
- Creamy Cheesecake Filling: A smooth, rich layer infused with banana flavor.
- Decadent Banana Pudding Layer: Sweet, custardy pudding that melts in your mouth.
- Crunchy Topping: A golden, crispy topping that ties it all together.
Ingredients and Substitutions

Essential Ingredients for the Cheesecake Base
The foundation of any great banana pudding crunch cheesecake is its base. This crust needs to be firm yet buttery, providing the perfect contrast to the creamy filling. Here’s what you’ll need:
- Vanilla wafers or graham crackers – These add a nostalgic crunch that pairs well with banana pudding.
- Melted butter – Helps bind the crust together.
- Sugar – A little sweetness enhances the flavor.
- Cinnamon (optional) – Adds warmth and depth.
Alternative crust options: If you’re out of vanilla wafers, try golden Oreos or digestive biscuits. For a gluten-free version, use almond flour mixed with melted butter and sugar.
The Secret to the Perfect Banana Pudding Layer
The banana pudding layer is what sets this cheesecake apart from traditional ones. It’s rich, creamy, and loaded with banana flavor. Here’s what goes into it:
- Instant banana pudding mix – The easiest way to achieve a thick, flavorful pudding layer.
- Cold milk – Helps the pudding set perfectly.
- Sliced ripe bananas – Fresh banana slices enhance the natural sweetness.
- Whipped cream or Cool Whip – Adds lightness to the texture.
If banana pudding mix isn’t available, you can use vanilla pudding with mashed bananas for a similar effect.
Crunchy Toppings and Best Substitutes
The crunch factor is key to making this dessert unforgettable! The topping adds texture and balances the creamy layers. You’ll need:
- Crushed vanilla wafers – The classic choice for a crispy bite.
- Caramelized pecans or walnuts – Adds a nutty depth.
- Toasted coconut flakes – Brings a tropical twist.
Want to mix things up? Try crushed butter cookies or cinnamon granola instead!
Step-by-Step Recipe Instructions
Preparing the Crust – The Crunchy Foundation
- Crush vanilla wafers (or graham crackers) into fine crumbs using a food processor or a rolling pin.
- Mix with melted butter and sugar until combined.
- Press the mixture firmly into the bottom of a springform pan.
- Bake at 325°F (163°C) for 10 minutes (if making a baked version), then let it cool.
Making the Cheesecake Filling – Smooth and Creamy
- In a mixing bowl, beat cream cheese and sugar until smooth.
- Add eggs (one at a time), beating gently after each addition.
- Mix in vanilla extract and sour cream for extra creaminess.
- Fold in prepared banana pudding to enhance the banana flavor.
For a no-bake version, use gelatin or instant pudding mix to help the cheesecake set.
Assembling the Banana Pudding Layer
- Spread a thin layer of banana pudding over the cheesecake filling.
- Arrange sliced bananas evenly on top.
- Add another layer of pudding for extra richness.
This step is key to achieving that signature banana pudding cheesecake flavor!
Adding the Crunch – Best Techniques
For the perfect crunch topping:
- Crush vanilla wafers and mix them with melted butter.
- Sprinkle the mixture evenly over the top of the cheesecake.
- Optionally, add caramelized nuts or toasted coconut for extra flavor.
Baking vs. No-Bake Options
- Baked version: Bake at 325°F (163°C) for about 50 minutes, then cool and refrigerate.
- No-bake version: Let it set in the fridge for at least 4 hours before serving.

Tips for the Best Banana Pudding Crunch Cheesecake
How to Get a Perfectly Creamy Cheesecake
A silky, smooth cheesecake starts with the right techniques. Here’s how to ensure your banana pudding crunch cheesecake has the perfect texture:
- Use room-temperature ingredients – Cold cream cheese can lead to lumps. Let it sit out for 30 minutes before mixing.
- Don’t overmix the batter – Too much air can cause cracks in the cheesecake. Mix on low speed until just combined.
- Use a water bath (bain-marie) – This gentle baking method prevents cracks and keeps the cheesecake moist.
For a no-bake version, make sure to refrigerate the cheesecake for at least 4 hours (overnight is even better!).
Preventing a Soggy Crust
Nobody likes a soggy crust! Follow these tips to keep your base crisp:
- Pre-bake the crust – If you’re making a baked cheesecake, baking the crust for 10 minutes helps create a firm base.
- Let it cool before adding the filling – A hot crust can absorb moisture from the filling, making it soft.
- Use a layer of melted chocolate – Brushing a thin layer of melted white chocolate on the crust before adding the filling creates a moisture barrier.
Chilling and Serving Tips
- Refrigerate for at least 4-6 hours before slicing to allow flavors to meld.
- Use a hot knife (dip in warm water and wipe dry) for clean slices.
- Garnish with whipped cream, caramel drizzle, or extra crushed wafers for an extra-special touch.
For a fun twist, serve individual portions in mini mason jars for a party-friendly treat!
Variations and Customizations
Mini Cheesecakes – Individual Servings
Want to make your banana pudding crunch cheesecake even more fun? Try turning it into mini cheesecakes!
- Use a muffin tin lined with cupcake liners.
- Press a small amount of crust into each cup and pre-bake if needed.
- Fill with the cheesecake mixture and top with banana pudding.
- Chill or bake as usual, then add crushed wafers before serving.
These bite-sized treats are perfect for parties, picnics, or grab-and-go desserts!
Adding Chocolate or Caramel for Extra Flavor
If you love extra indulgence, try these flavor-boosting additions:
- Chocolate drizzle – Melted dark or white chocolate adds richness.
- Caramelized bananas – Sauté banana slices in butter and brown sugar for a next-level topping.
- Nutty crunch – Add a sprinkle of chopped pecans or hazelnuts for extra texture.
Making a Healthier Version
Want a lighter take on this dessert? Try these swaps:
- Use Greek yogurt instead of sour cream for protein-packed creaminess.
- Swap honey or maple syrup for refined sugar.
- Choose almond or coconut flour for a lower-carb crust.
Even with these changes, you’ll still get all the creamy, crunchy goodness of the original!
For more delicious dessert ideas, check out our sourdough discard cinnamon rolls for another sweet treat option!
Serving and Pairing Suggestions

Best Drinks to Serve with Banana Pudding Crunch Cheesecake
Pairing your banana pudding crunch cheesecake with the right drink enhances the overall experience. Here are some perfect beverage options:
- Classic milk – The creamy, slightly sweet taste balances the crunchy and rich cheesecake.
- Vanilla latte or cappuccino – Coffee’s bold flavors contrast beautifully with the dessert’s sweetness.
- Sweet dessert wines – A glass of Moscato or Riesling complements the banana and vanilla flavors.
- Iced caramel macchiato – Caramel’s deep, sugary notes bring out the dessert’s rich layers.
For a non-caffeinated option, try banana milk or vanilla almond milk for a subtle, complementary flavor.
Perfect Occasions for This Dessert
Banana pudding crunch cheesecake is a showstopper at any event! Here’s when to serve it:
- Family gatherings – A guaranteed crowd-pleaser for birthdays and holidays.
- Summer barbecues – Its cool, creamy texture is refreshing on hot days.
- Potlucks and office parties – Easy to transport and always a hit!
- Romantic dinners – Serve with a drizzle of chocolate or caramel for a luxurious touch.
Common Mistakes and How to Fix Them
Overmixing the Batter
One of the biggest cheesecake mistakes is overmixing. This introduces too much air, leading to cracks when baked. Here’s how to avoid it:
- Mix ingredients on low speed until just combined.
- Use room-temperature cream cheese for easier blending.
- Beat eggs one at a time, gently incorporating each before adding the next.
If your cheesecake still cracks, don’t panic! A whipped cream topping or banana slices can cover imperfections.
Dealing with Cracks in Cheesecake
Cracks are common but avoidable. Here’s what you can do:
- Use a water bath – This creates gentle heat and prevents drying out.
- Cool gradually – Let the cheesecake cool in the oven with the door slightly open.
- Don’t overbake – The center should still be slightly jiggly when removed.
If cracks still happen, no worries! They won’t affect the taste, and a banana pudding topping can cover them beautifully.
Fixing a Soft or Runny Texture
A cheesecake that doesn’t set properly can be frustrating. Here’s how to fix it:
- Chill for at least 6 hours – Overnight is best for a firm texture.
- Use the right thickening agents – A no-bake version may need gelatin or extra pudding mix.
- Bake a little longer – If it’s underbaked, return it to the oven for 5-10 more minutes.
Following these tips ensures your banana pudding crunch cheesecake turns out perfect every time!
FAQs – Answering Popular Questions
Can You Use Pudding Mix to Flavor Cheesecake?
Yes! Using instant pudding mix is a fantastic way to add flavor and improve the texture of your banana pudding crunch cheesecake. The pudding mix helps create a thicker, creamier consistency while infusing the cheesecake with rich banana flavor.
For best results, choose instant banana pudding mix and mix it directly into the cheesecake batter before baking. If you’re making a no-bake cheesecake, whisk the pudding mix with cold milk first, then fold it into the cream cheese mixture. This ensures a smooth, lump-free texture.
If you prefer a more natural approach, you can mash ripe bananas into the cheesecake filling instead of using pudding mix. This will create a more subtle, homemade banana flavor.
What Can I Use in Banana Pudding Instead of Vanilla Wafers?
Traditional banana pudding uses vanilla wafers, but if you’re looking for alternatives, here are some delicious swaps:
Graham crackers – A slightly different texture but still crunchy and buttery.
Golden Oreos – Adds a sweeter, vanilla flavor with extra crunch.
Shortbread cookies – Perfect for a rich, buttery twist.
Digestive biscuits – Great for a more European-style crust.
Nilla wafer alternatives – Gluten-free brands work well for those with dietary restrictions.
Each alternative will slightly change the texture and taste, but all pair wonderfully with the creamy banana pudding and cheesecake layers.
How Long Does Banana Pudding Crunch Cheesecake Last in the Fridge?
Your cheesecake will stay fresh in the refrigerator for 4-5 days if stored properly. To keep it from drying out or absorbing fridge odors:
Cover it tightly with plastic wrap or store it in an airtight container.
Avoid placing strong-smelling foods nearby (like onions or garlic).
If possible, store slices individually to keep each piece fresh longer.
For longer storage, freeze your cheesecake
Can I Make This Cheesecake Without Baking?
easier to prepare. Instead of eggs, use gelatin or extra pudding mix to help the cheesecake set in the fridge.
For the best texture:
Refrigerate the cheesecake for at least 6 hours (overnight is even better!).
Use cold heavy cream and beat until stiff peaks form before folding it into the mixture.
Make sure the crust is firmly pressed and chilled before adding the filling.
A no-bake version is perfect for summer when you want a creamy, cool dessert without turning on the oven!
Conclusion – Why You’ll Love This Cheesecake
A Dessert That Has It All
If you’re a fan of banana pudding and cheesecake, this dessert is truly the best of both worlds. With its silky-smooth filling, crunchy topping, and rich banana flavor, every bite is a delightful combination of textures and tastes. Plus, whether you prefer a baked or no-bake version, this recipe is easy to customize and perfect for any occasion.
Final Thoughts and Serving Inspiration
Ready to impress your family and friends with a homemade banana pudding crunch cheesecake? Whether you’re making it for a holiday gathering, birthday party, or just because, this dessert is guaranteed to be a hit.
Top it off with whipped cream, caramel drizzle, or extra crushed wafers for a picture-perfect presentation. Serve it with a cup of coffee or a scoop of vanilla ice cream for an even more indulgent treat.
Now that you have all the tips, tricks, and variations, it’s time to start baking (or chilling!). Enjoy every creamy, crunchy, banana-filled bite! 🍌🍰
Print
Banana Pudding Crunch Cheesecake – The Ultimate Guide
- Total Time: 6 hours
- Yield: 8 1x
Description
Indulge in this creamy, crunchy banana pudding crunch cheesecake! A must-try dessert with layers of banana pudding, cheesecake, and a crispy topping.
Ingredients
- 2 cups crushed vanilla wafers
- ½ cup melted butter
- 2 tbsp sugar
- 24 oz cream cheese, softened
- 1 cup granulated sugar
- 3 eggs
- 1 tsp vanilla extract
- ½ cup sour cream
- 1 box (3.4 oz) instant banana pudding mix
- 1¼ cups cold milk
- 2 ripe bananas, sliced
- 1 cup whipped cream or Cool Whip
- ½ cup crushed vanilla wafers (for topping)
- Caramel drizzle (optional)
Instructions
1. Prepare the Crust
- Preheat oven to 325°F (163°C).
- Mix crushed vanilla wafers with melted butter and sugar.
- Press the mixture into a greased springform pan.
- Bake for 10 minutes, then let cool.
2. Make the Cheesecake Filling
- Beat cream cheese and sugar until smooth.
- Add eggs one at a time, mixing gently.
- Stir in vanilla extract and sour cream.
- Pour over the crust.
3. Bake the Cheesecake
- Bake at 325°F for 50 minutes.
- Turn off the oven and let the cheesecake cool inside for 1 hour.
- Refrigerate for at least 4 hours.
4. Prepare the Banana Pudding Layer
- Whisk banana pudding mix with cold milk until thick.
- Spread a thin layer over the cheesecake.
- Add sliced bananas.
5. Add the Crunchy Topping
- Sprinkle crushed vanilla wafers over the top.
- Drizzle with caramel (optional).
6. Chill & Serve
- Refrigerate for 6 hours before slicing.
- Serve with whipped cream or extra wafers.
Notes
- Use Ripe Bananas for the Best Flavor: The riper the bananas, the sweeter and more flavorful your cheesecake will be. Avoid using green or under-ripe bananas.
- Chill for Maximum Flavor: This cheesecake tastes even better after being refrigerated overnight. The layers set properly, and the flavors deepen.
- Prevent Soggy Wafers: If you want to keep the wafer topping extra crunchy, add it right before serving rather than during assembly.
- Make It Ahead of Time: This dessert can be made up to 2 days in advance and stored in the fridge, making it perfect for parties and gatherings.
- For a Firmer No-Bake Version: If making a no-bake cheesecake, mix 1 teaspoon of gelatin with warm water and fold it into the cheesecake batter before chilling.
- Substitutions for Different Dietary Needs:
- Gluten-Free Option: Use gluten-free vanilla wafers or almond flour for the crust.
- Low-Sugar Version: Replace sugar with a sugar substitute like stevia or monk fruit sweetener.
- Dairy-Free Alternative: Use dairy-free cream cheese, coconut milk instead of regular milk, and coconut whipped cream.
- Serving Suggestion: Drizzle with caramel sauce or melted chocolate for an extra indulgent touch.
- Prep Time: 20 Minutes
- Cook Time: 50 Minutes
- Category: Dessert
- Cuisine: American
Nutrition
- Calories: 450 kcal
- Sugar: 30 g
- Sodium: 320 mg
- Fat: 28 g
- Saturated Fat: 15 g
- Carbohydrates: 45 g
- Fiber: 2 g
- Protein: 6 g
- Cholesterol: 80 mg
Keywords: Banana cheesecake, banana pudding dessert, crunchy banana cheesecake

